

How Electric Trailer Brakes Work — and How to Troubleshoot Them
Follow the brake signal from the controller to the magnets, then use R&P brake assemblies and fitment checks to diagnose weak, uneven, intermittent, or non-working electric trailer brakes.

Electric trailer brakes are a chain: the controller sends power, the wiring carries it, the magnet reacts, and the brake shoes use the rotating drum to create braking force.
When trailer braking becomes weak, intermittent, uneven, or completely absent, the fastest diagnosis usually comes from finding where that chain stops working.
How Electric Trailer Brakes Work
Dexter describes the same basic sequence: the brake controller sends current to the electric brake, the magnet energizes against the rotating drum, and the resulting mechanical movement expands the shoes against the drum.
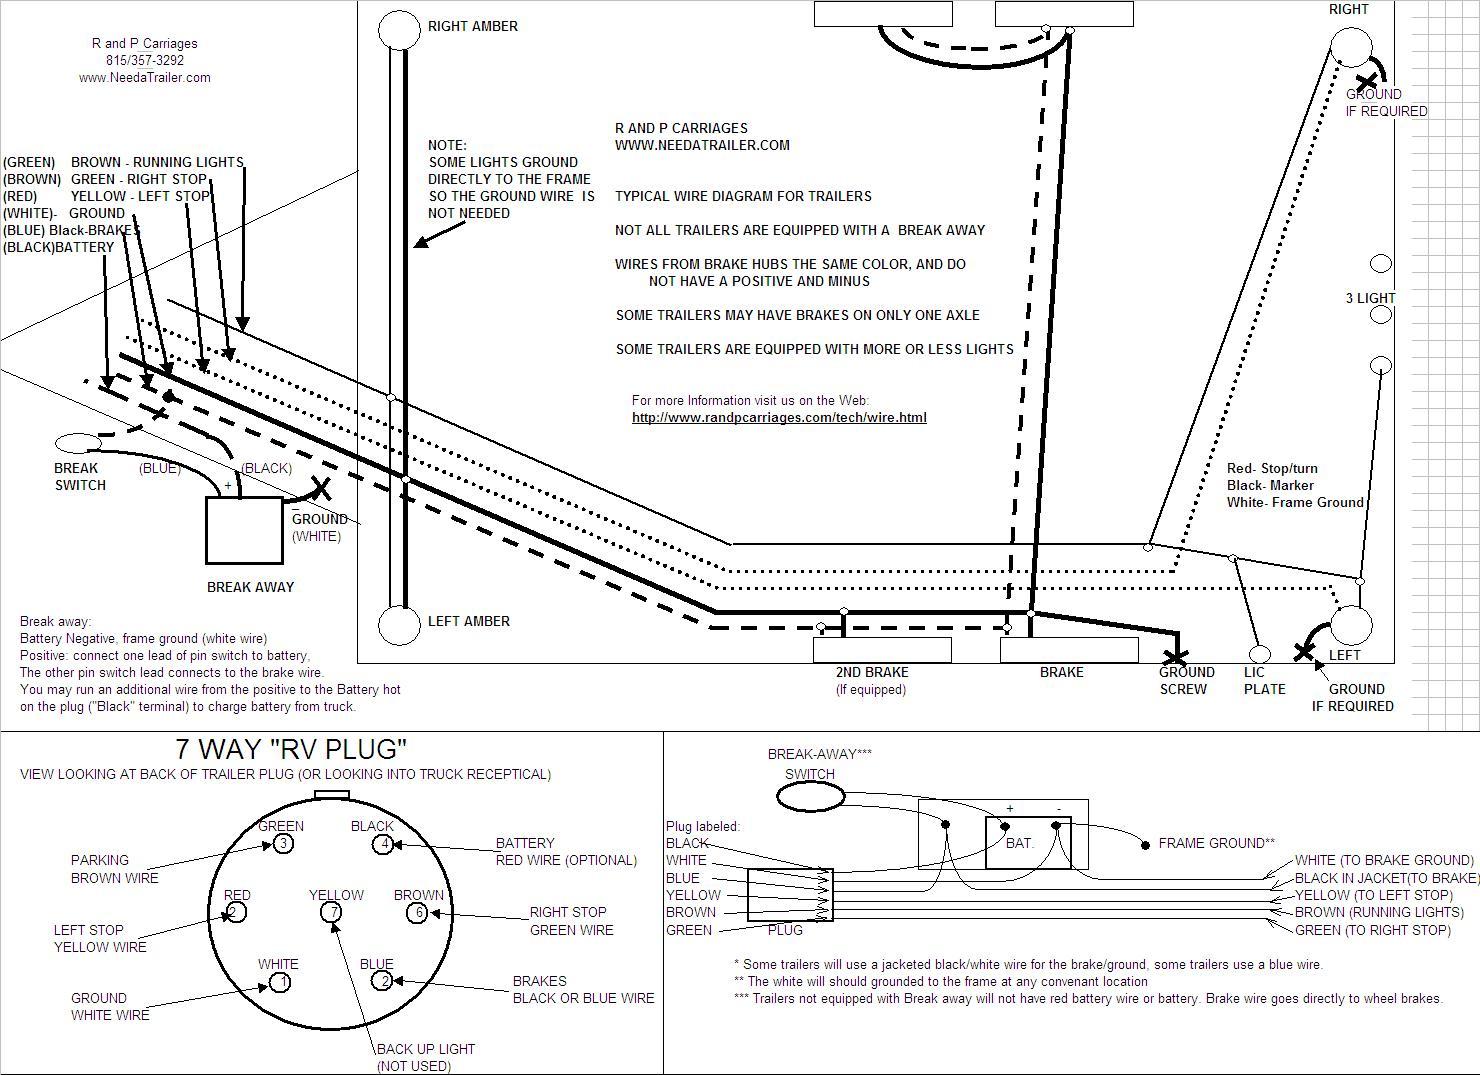
The Brake Signal Starts at the 7-Way
The trailer brake circuit reaches the trailer through the tow-vehicle connection. On the R&P wiring diagram below, the brake-control circuit is identified with the blue lead.
What Is Actually Inside the Brake Assembly?
A complete backing plate brings the mechanical and electrical brake components together in one service assembly:
- Brake shoes
- Electric magnet
- Actuating arm
- Return springs
- Adjuster mechanism
- Backing plate
- Brake wiring leads

This is R&P's common complete replacement pair for standard 3,500 lb electric-drum applications. Each assembly uses a standard green-wire magnet listed at approximately 3.0 A at 12 V.
View BRK-EB10-KIT Shop 10" BrakesBrake Magnets: Test the Circuit, Not Just the Magnet
The magnet is the electrical component inside the drum. If it does not receive adequate current, the brake cannot develop normal braking force.
Dexter's current maintenance guidance uses approximately 2.5–3 amps per brake at full power as a useful expected service range, while your BRK-EB10-KIT listing specifies approximately 3.0 A at 12 V for its standard green-wire 3,500 lb magnet. :contentReference[oaicite:2]{index=2}
| Measurement | What It Tells You |
|---|---|
| Voltage at the brake | Whether controller output is reaching the magnet circuit. |
| Current draw | Whether the magnet circuit is drawing a plausible amount of current under full application. |
| Continuity | Whether wiring is open or disconnected; continuity alone does not prove full-load performance. |
| Voltage drop | Helps identify resistance in wiring, terminals, connections, or grounds under load. |
Do Not Ignore the Ground Circuit
Electric brakes need a complete electrical circuit. A poor ground can reduce the current available to the magnets even when voltage appears present with little or no load.
Inspect:
- Trailer plug ground connection
- Main trailer ground connection
- Brake-branch wiring
- Corroded crimps or splices
- Frame-ground attachment points where used
- Broken conductors near moving axle wiring
No Trailer Brakes at All
- Confirm the brake controller is powered and configured.
- Use the controller's manual override and check output.
- Inspect the 7-way connector and brake-output terminal.
- Check the trailer brake circuit for continuity and damage.
- Verify the trailer ground path.
- Check for current at the individual brake circuits.
If all brakes disappear simultaneously, a shared electrical problem is often more plausible than every magnet failing at exactly the same time.
Brakes Work, but They Feel Weak
Weak braking can be electrical, mechanical, or both.
- Brake-controller gain and setup
- Voltage/current at the magnets
- Brake adjustment
- Magnet wear surface
- Shoe wear or contamination
- Drum scoring, glazing, grease, or heat damage
- High-resistance wiring or ground connections
Dexter recommends routine manual-brake adjustment after the initial seating period and then approximately every 3,000 miles or as performance requires. :contentReference[oaicite:4]{index=4}
Want Less Manual Adjustment?
A self-adjusting assembly maintains shoe-to-drum clearance during normal operation and can remove one common maintenance variable from the brake system.

This pair fits many standard 3,500 lb applications using the common 10" × 2.25" brake family. It replaces the manual-adjust backing plates with a forward self-adjusting design while keeping the same basic fitment questions: diameter, width, flange, drum, and axle application.
View BK-10E-FSA-SETDexter states that Nev-R-Adjust brakes automatically maintain proper shoe clearance during normal operation. They still require inspection even though routine manual adjustment is eliminated. :contentReference[oaicite:5]{index=5}
One Side Brakes Harder Than the Other
Uneven braking usually means the two wheel positions are not doing the same work.
Compare both sides for:
- Adjustment
- Magnet current
- Brake-shoe wear
- Grease contamination
- Drum condition
- Broken springs or adjuster hardware
- Wiring resistance
- Correct left/right backing-plate orientation
Brakes Cut In and Out
Intermittent electric-brake problems deserve particular attention because movement can change the circuit while the trailer is traveling.
Inspect:
- 7-way terminals for looseness or corrosion
- Trailer-cord strain points
- Axle wiring where it flexes with suspension movement
- Crimp connectors and splices
- Ground connections
- Brake-controller error history if available
Dexter specifically recommends inspecting brake wiring for loose connections, corrosion, frayed wiring, and inadequate support while still allowing enough flexibility for axle movement. :contentReference[oaicite:7]{index=7}
Higher-Capacity Brakes Use the Same Basic Principle
The electric-brake operating principle does not change when you move from a common 3,500 lb axle to a larger #42 spindle system — but the physical brake and hub components do.

This kit replaces the brake assemblies, hub/drums, bearings, seals, and caps for one compatible axle. It illustrates the larger 12" × 2" electric-drum family used on many 5,200–7,000 lb #42 spindle applications.
View 92865-B-IMP-916 Shop Brakes & DrumsElectric Brake Maintenance
Dexter's current maintenance guidance is a good baseline for routine brake service. :contentReference[oaicite:8]{index=8}
When Should the Brake Assembly Be Replaced?
A complete backing-plate replacement becomes attractive when several service components are already worn or damaged.
Reasons may include:
- Worn or contaminated brake shoes
- Heavily worn magnet
- Damaged backing plate
- Corroded or seized adjuster hardware
- Broken springs or hardware
- Uneven braking that traces to the assembly itself
Dexter notes that magnets, shoes, and hardware can be serviced individually, but complete assemblies are often chosen because the backing plate arrives with the major brake hardware already assembled. :contentReference[oaicite:9]{index=9}
Before You Order Replacement Brakes
What Should I Send R&P for Brake Help?
- Axle tag photo
- Axle capacity if known
- Photo of the complete backing plate
- Brake diameter
- Shoe width
- Flange bolt count and spacing
- Photo of the inside of the drum
- Description of the symptom
- Brake-controller make/model
- Any voltage or current readings already taken
Start at the controller, verify the trailer connection and wiring, confirm the ground, measure what reaches the magnets, then inspect the mechanical brake and drum. If the assembly itself is worn, identify it by size, flange, orientation, axle application, and drum fitment before ordering.
Shop Trailer Brakes Shop Trailer Electrical Call 815-357-3292